Sheet Pan Focaccia

Jump to:
Why we love this recipe
Hi there sheet pan focaccia, you amazingly easy bread, you! For anyone who isn’t familiar with this bread, it is a kind of Italian flat bread (but not TOO flat) that has a texture kind of like a soft pizza crust.
I am usually kind of terrified about anything involving yeast, but this recipe works perfectly Every Single Time. And that’s not all!
Things it doesn’t need: Kneading. Lots of attention. A long baking time.
Things it has: A buttery rich texture. Rosemary flavor. A tendency to get swiped before it is officially served up.
Yes, this is a no knead version of focaccia, where you mix up water and yeast and flour, let it sit overnight in your fridge, let it rise in your handy dandy sheet pan, sprinkle it with rosemary and bake it up.
It. Is. Magical.
Ingredients you need
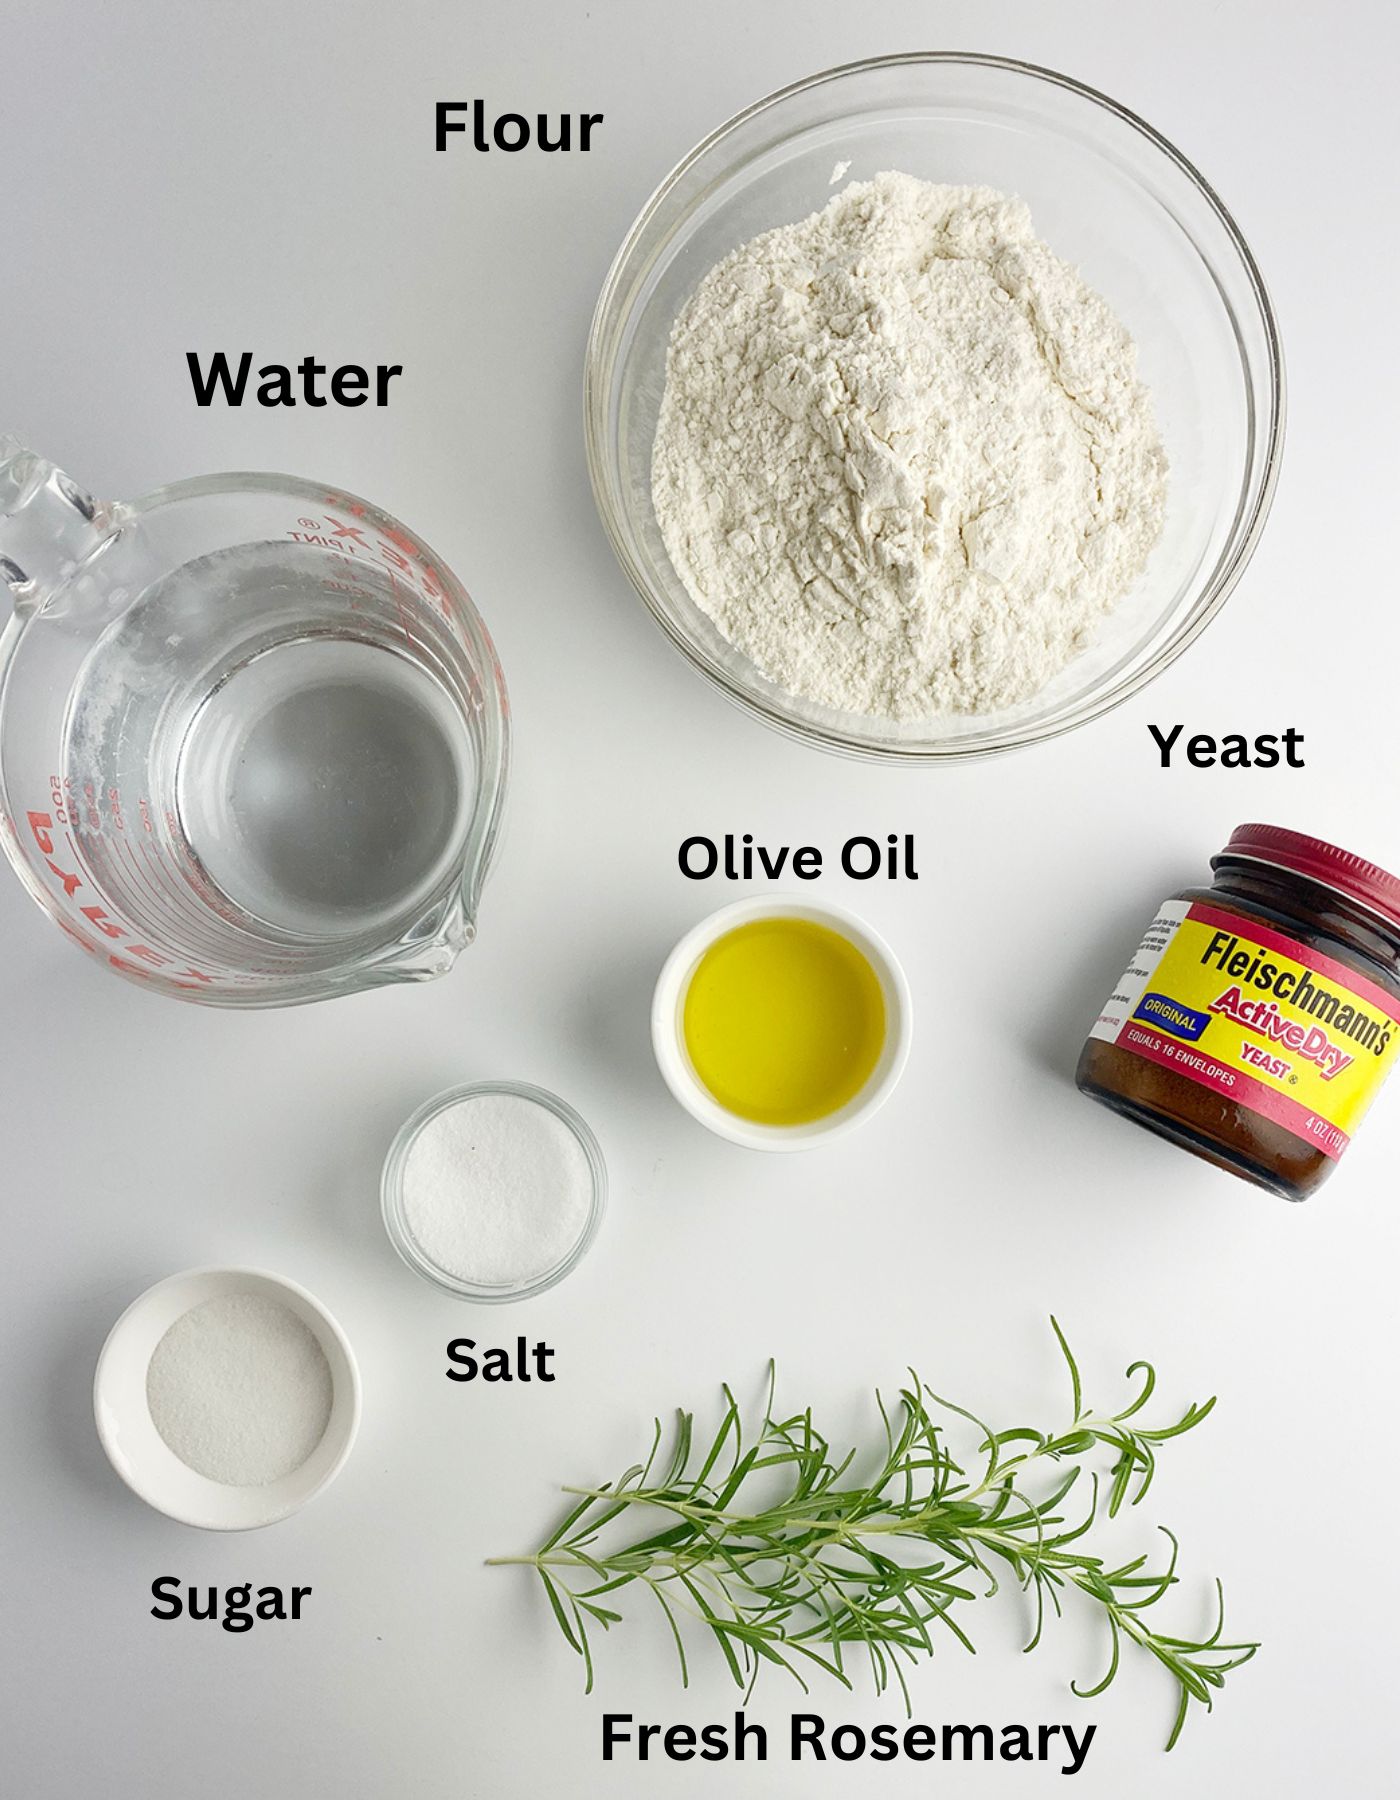
Ingredient Notes and Substitutions
- Flour: Use good old regular all purpose flour
- Yeast: I use the instant yeast in the jar, but the regular yeast in the packet will work just as well.
- Water: Make sure it is nice and warm but not HOT – yeast is an actual living thing, and we don’t want to damage it.
Here’s how you make this recipe
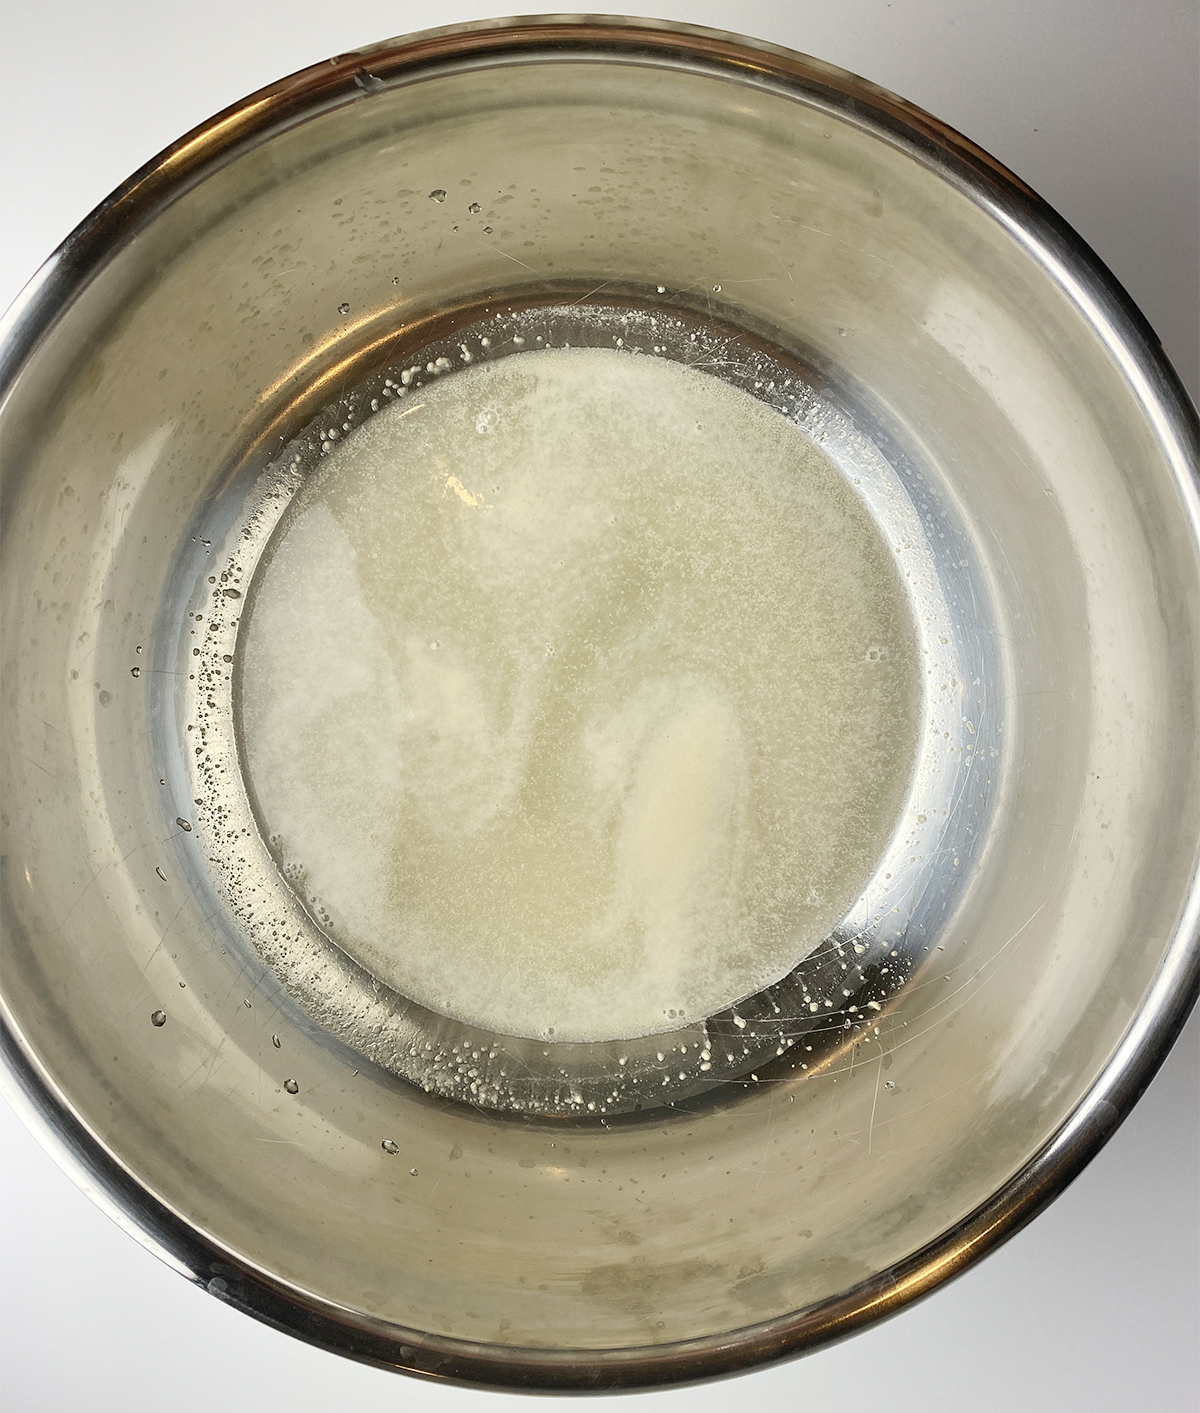
STEP 1: Put a packet of active dry yeast and a tablespoon of sugar in a large mixing bowl. Stir in 2 ½ cups of warm water, give it a gentle stir and then let it sit for 10 minutes.
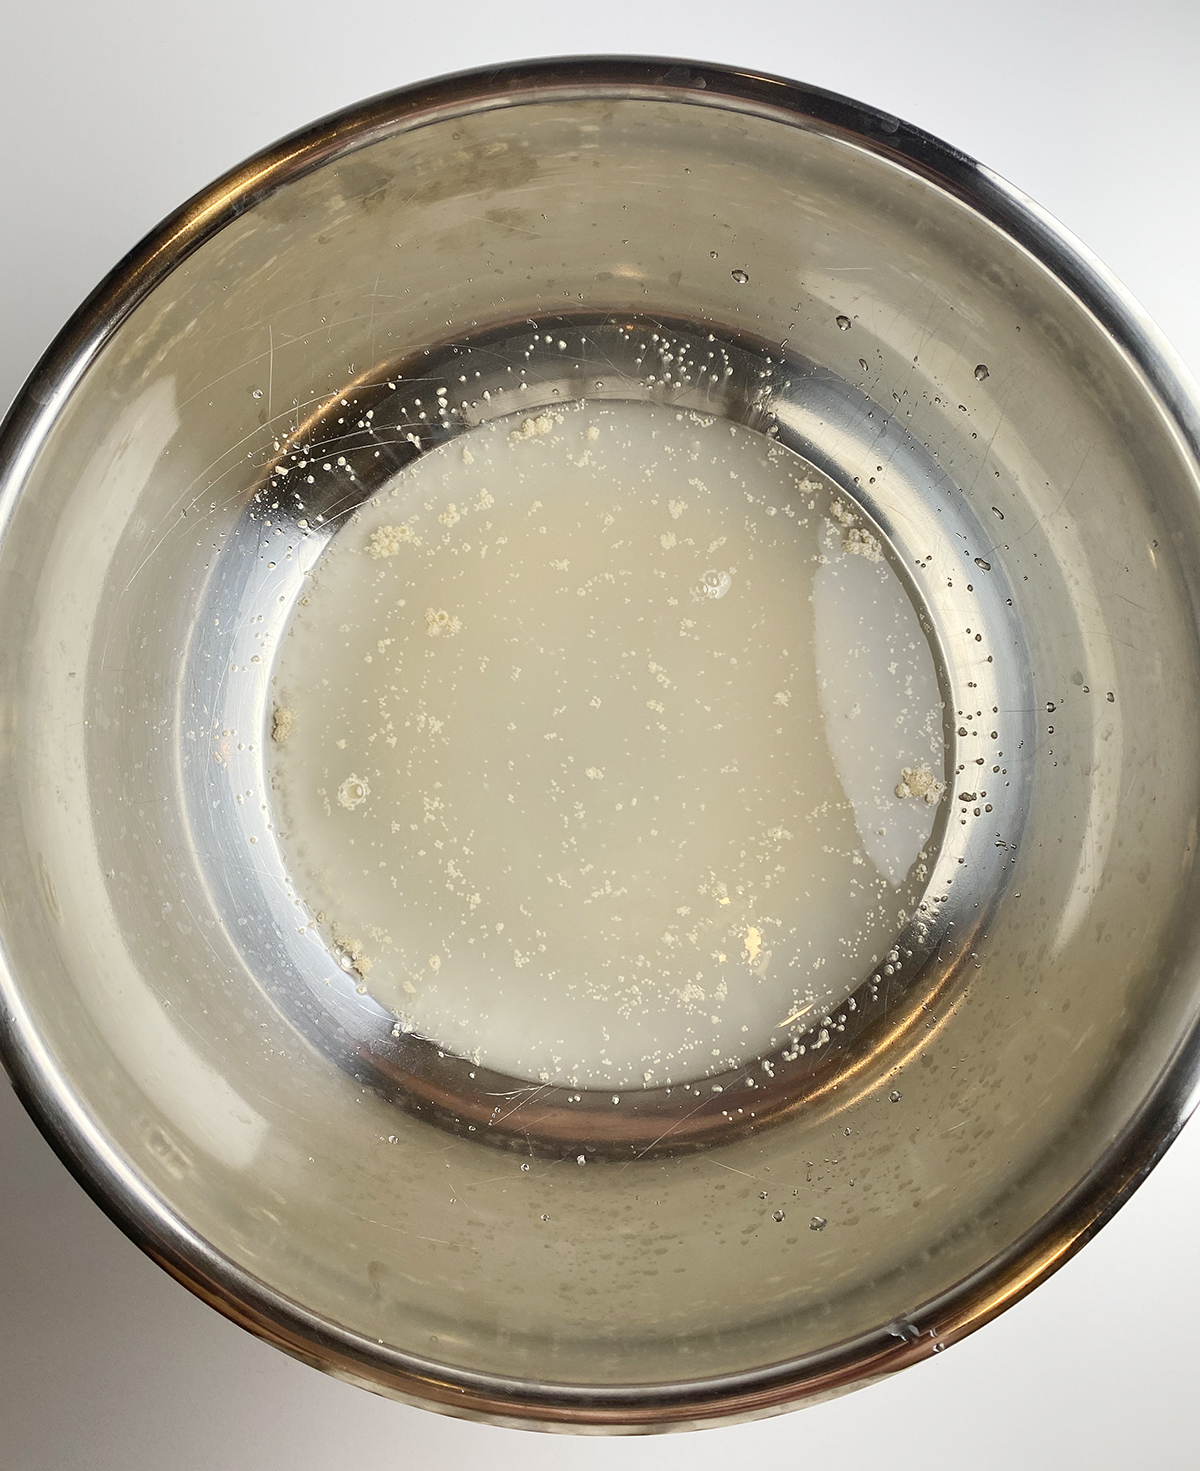
After ten minutes it should look a little fizzy and bubbly. That means the yeast is ready to do its job!
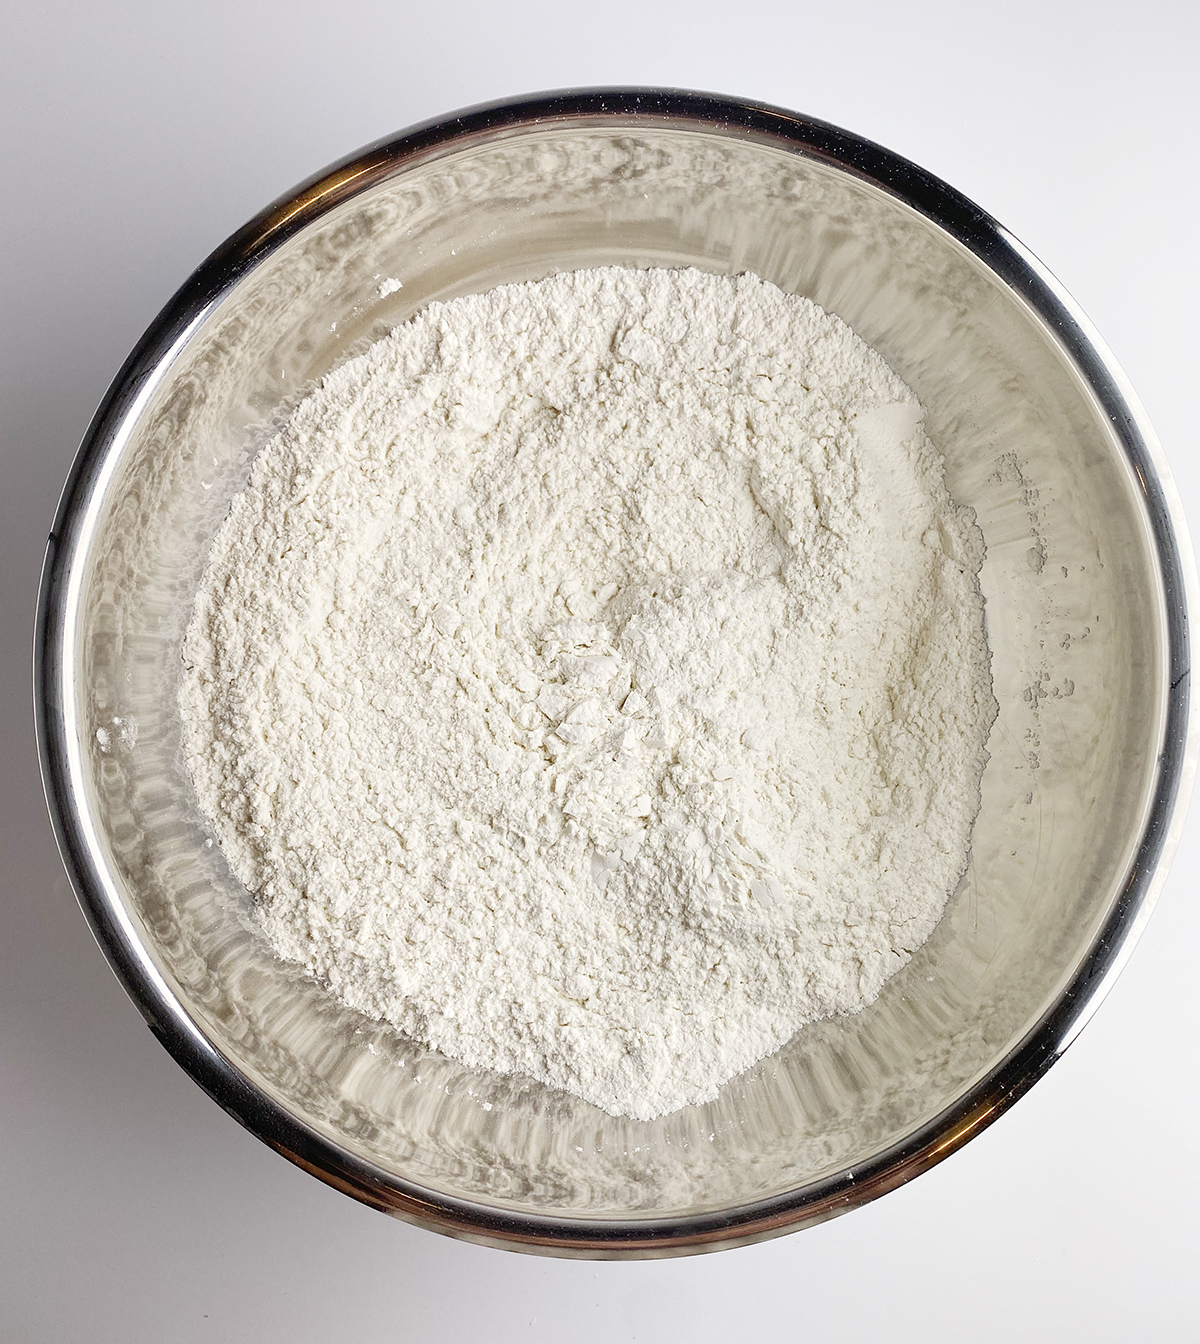
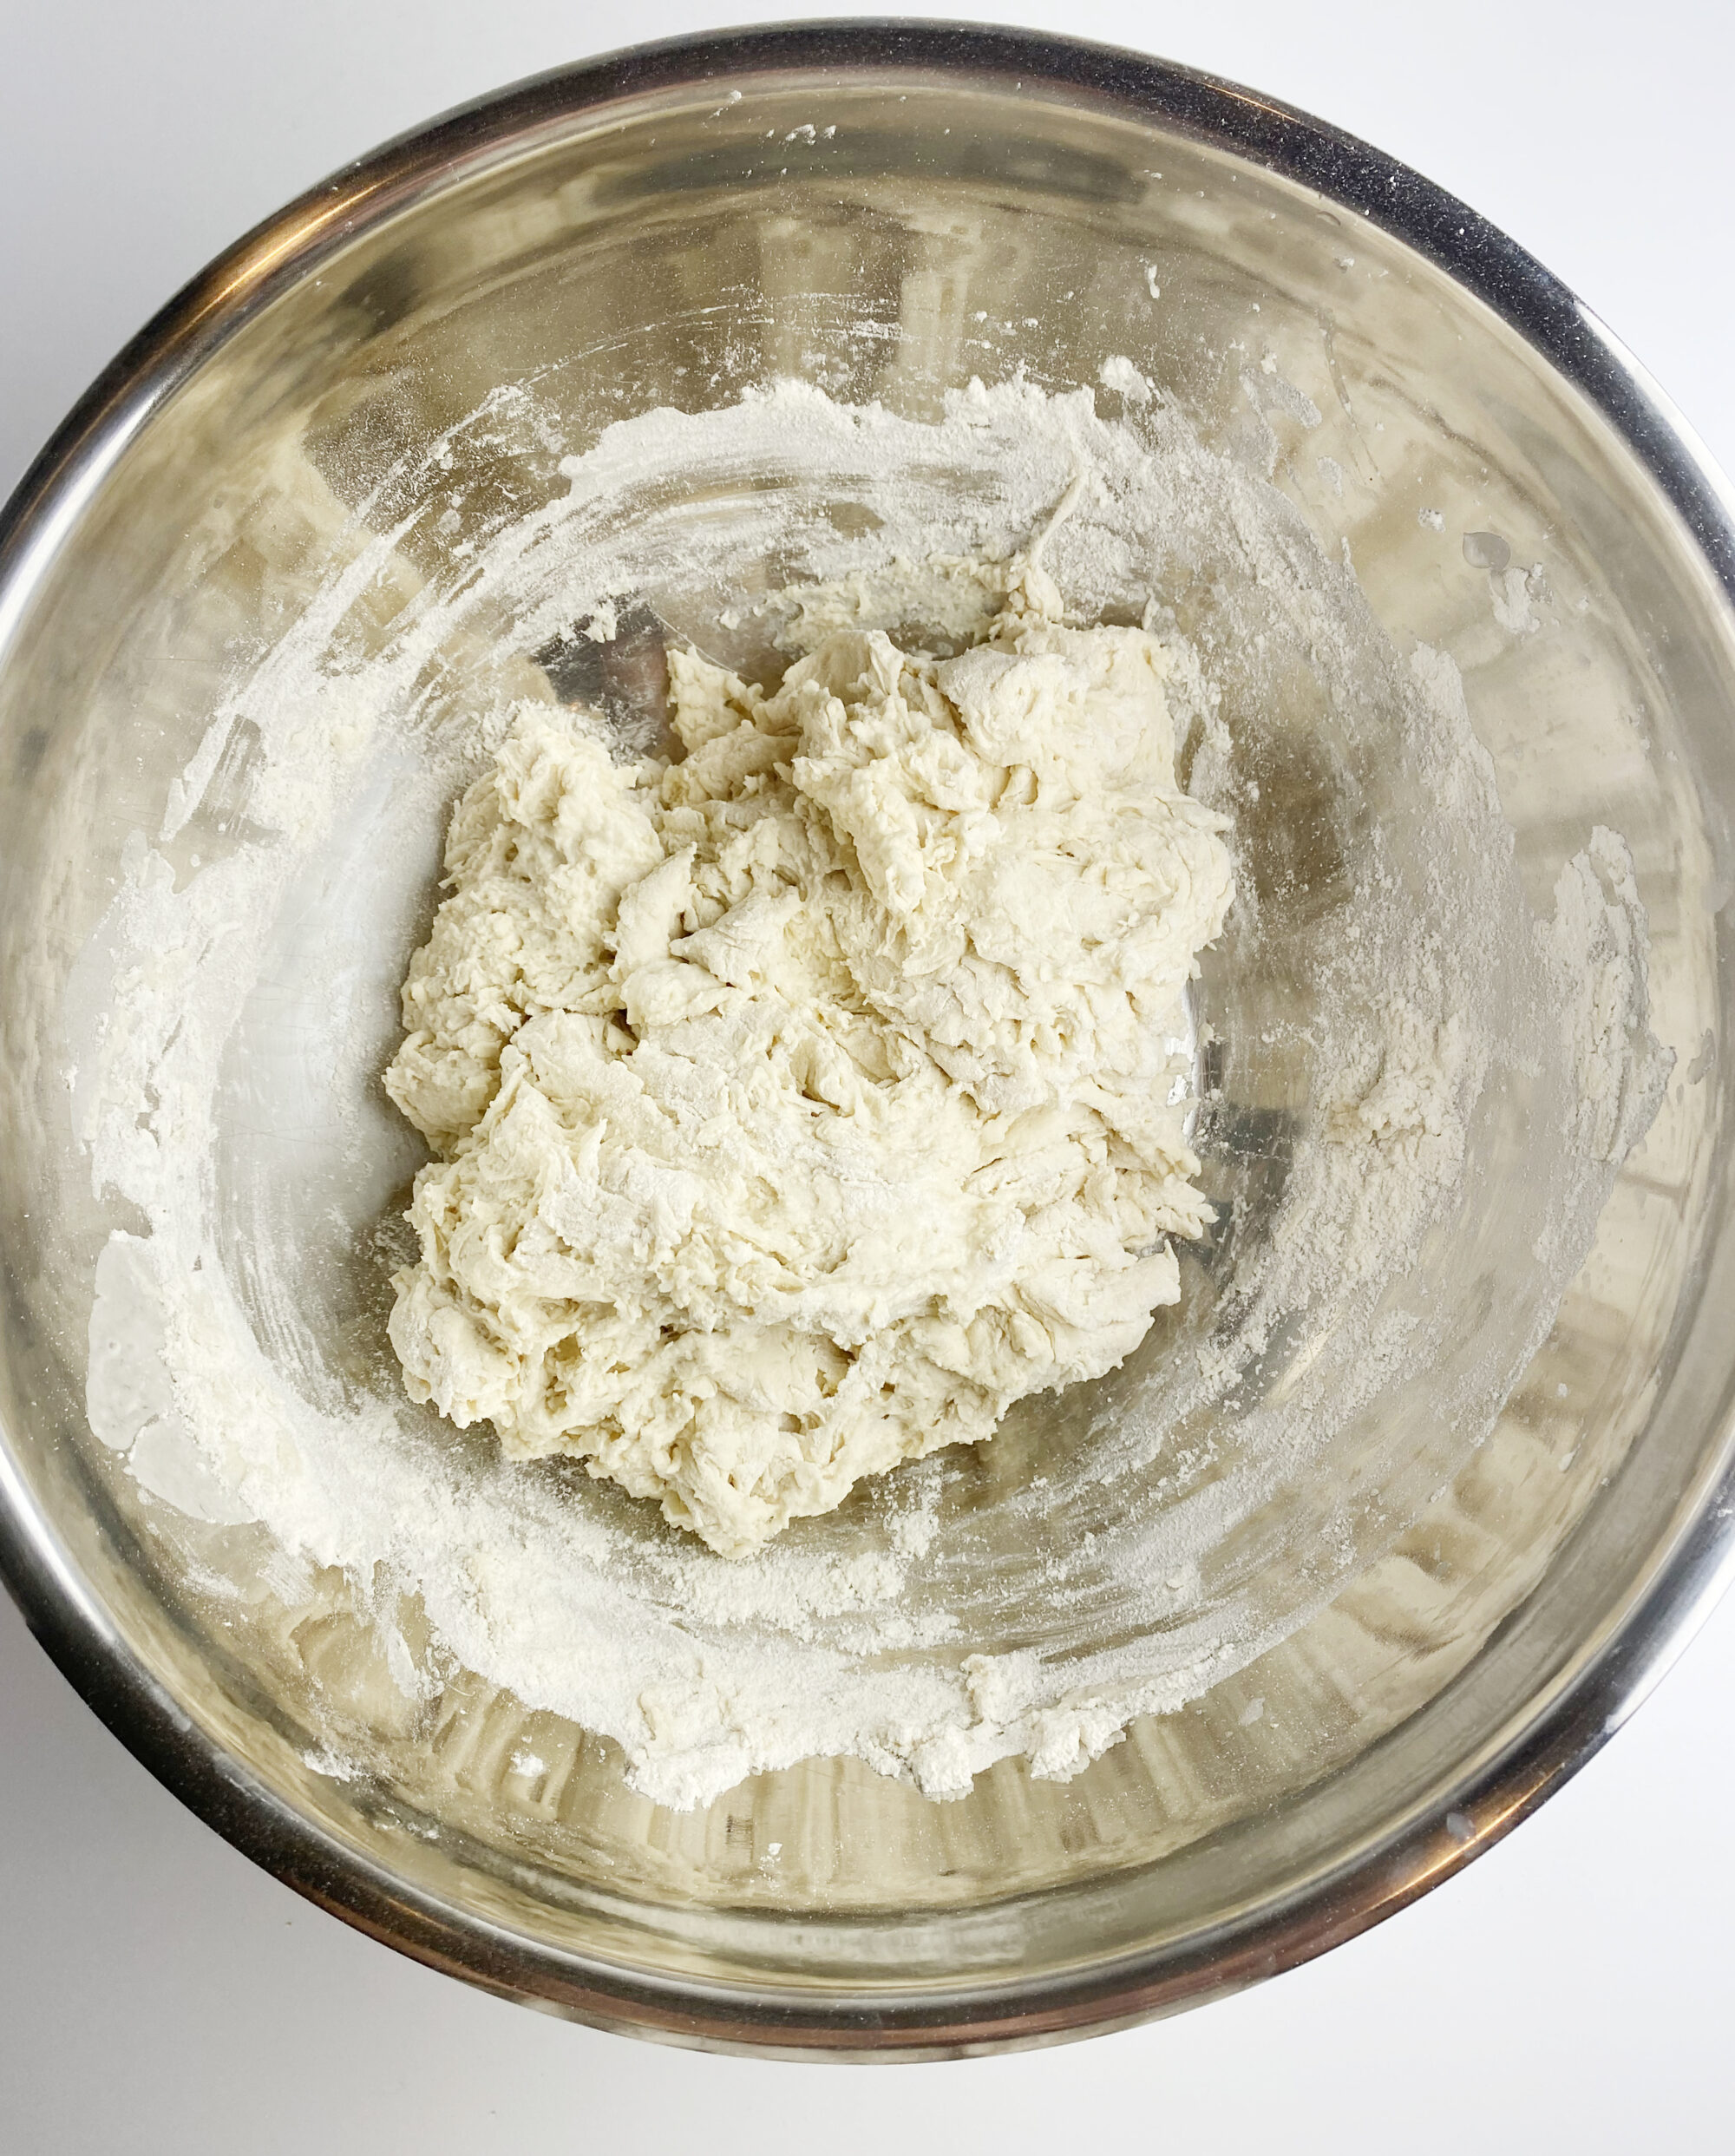
STEP 2: Mix up 5 cups of flour and a tablespoon of sea salt together in a large mixing bowl. I like to do this with a whisk to get these dry ingredients nice and mixed up.
STEP 5: Add your flour mixture the yeast mixture. Mix it up until you have a nice shaggy looking ball of dough.
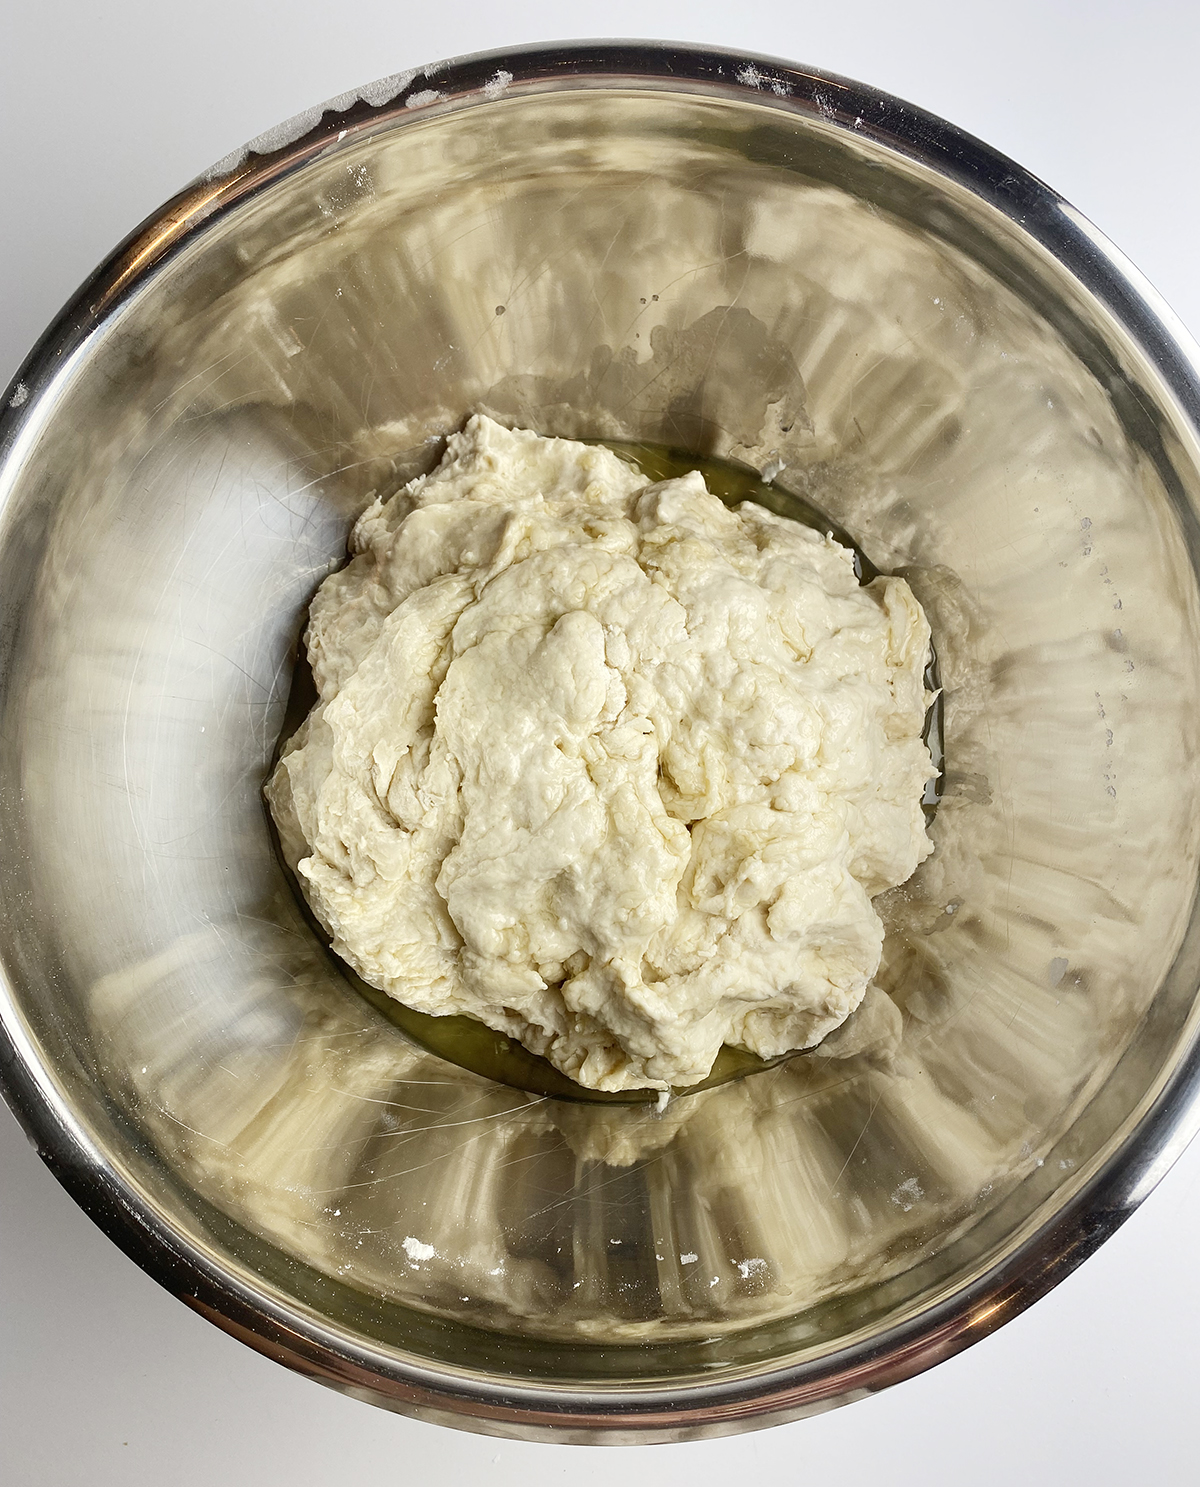
STEP 4: Wipe out the bowl that had the flour in it and pour in a quarter cup of olive oil. Put your dough in the bowl, turn it around so it is all coated with the oil.
STEP 5: Cover the bowl with plastic wrap. Pop it in your fridge and let it sit overnight (you want at least 10 hours of rising time, and for the dough to be nice and big, about double in size).
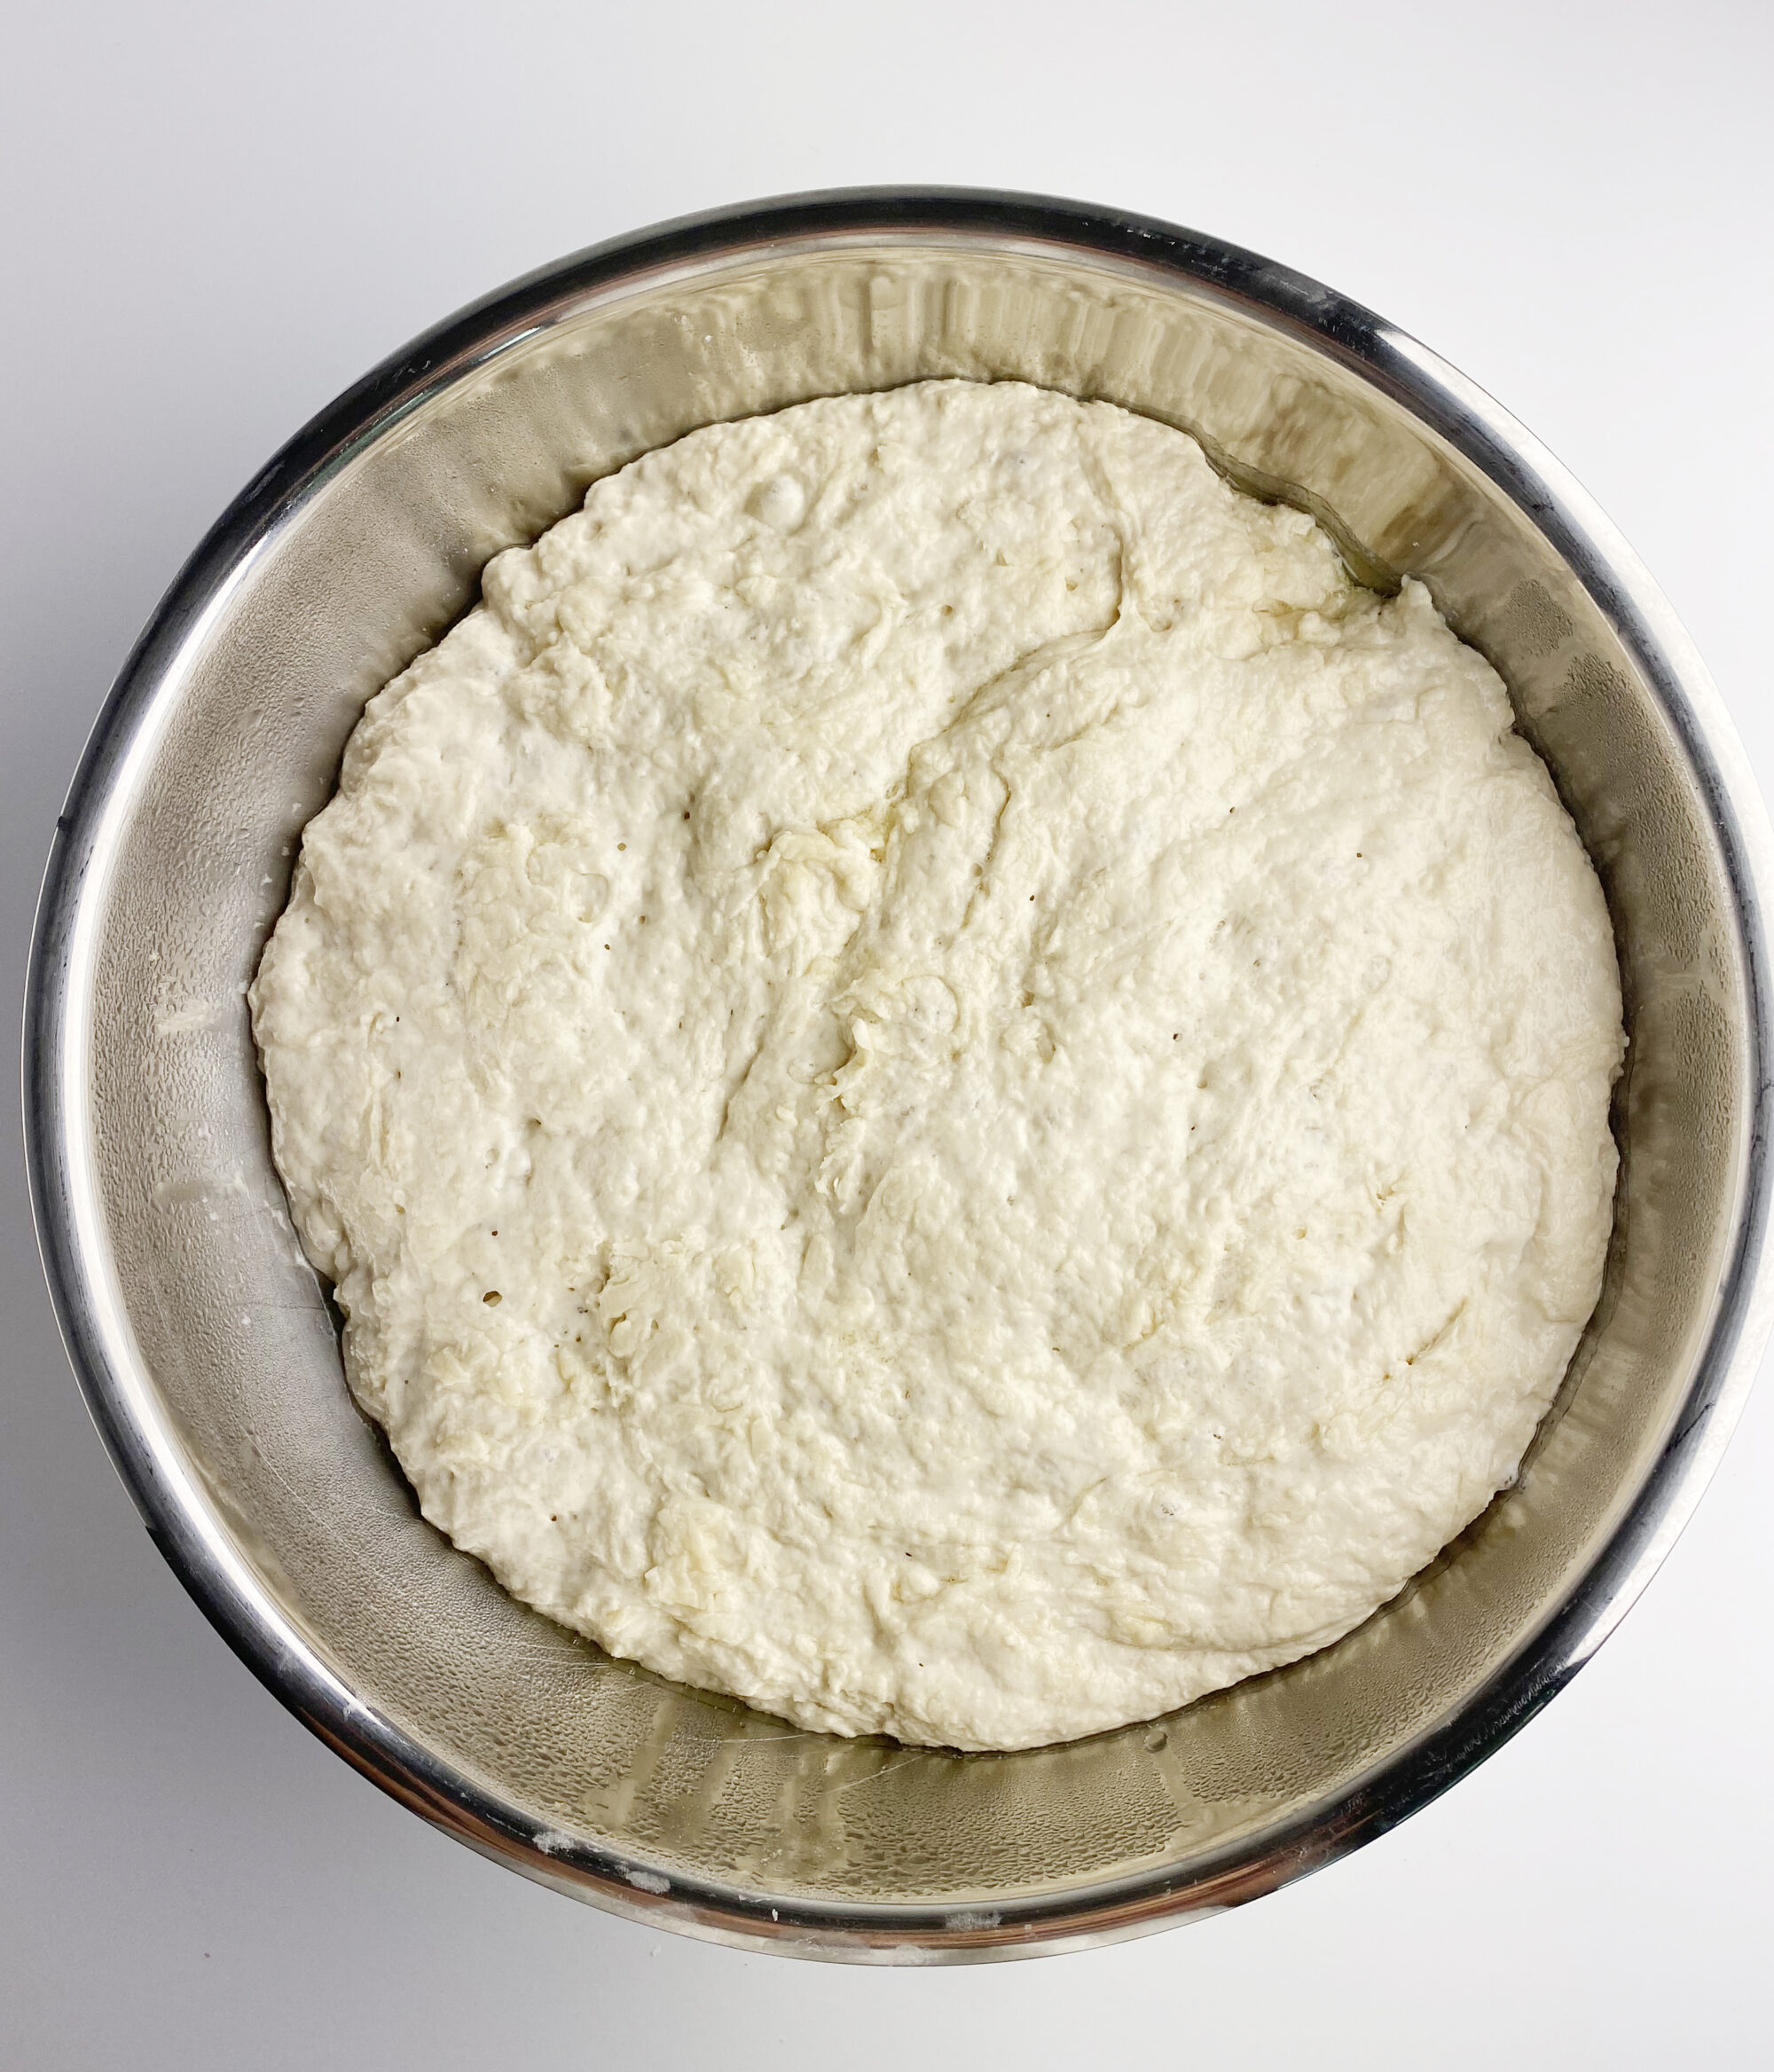
Look at that nice puffy bowl of focaccia dough!
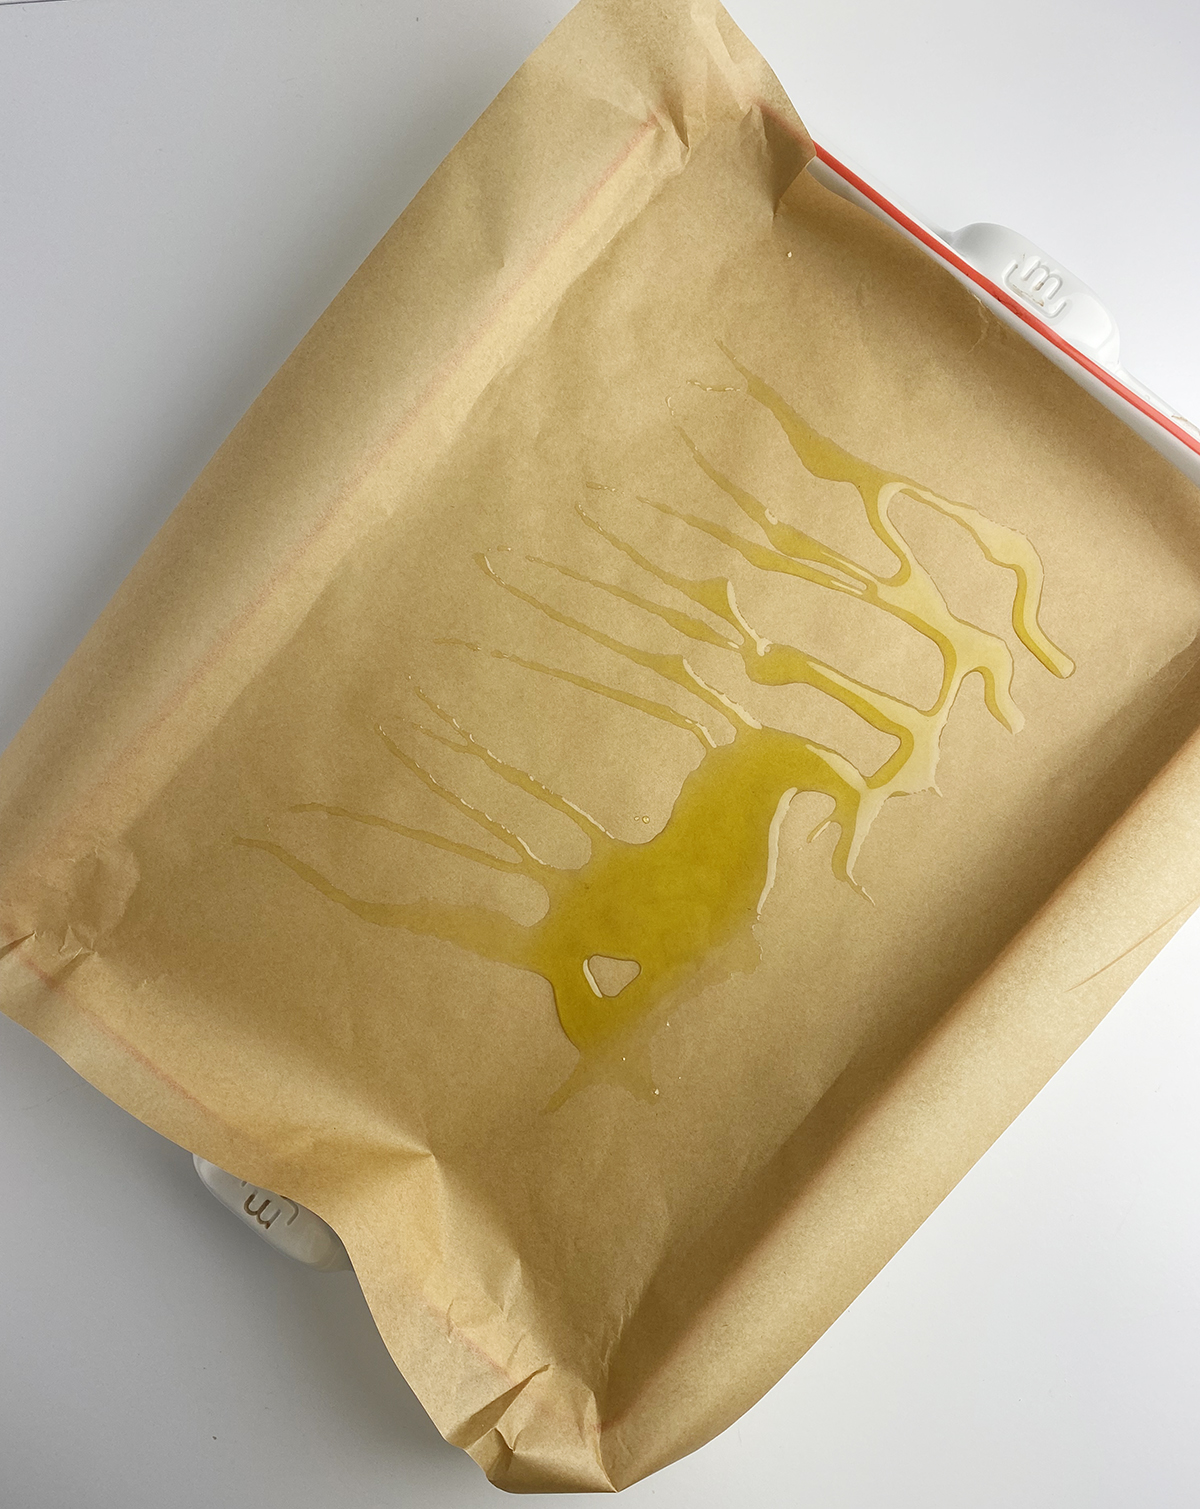
STEP 6: Once the dough has risen, line a 13 x 9 inch rimmed baking pan with parchment and drizzle the parchment with 2 tablespoons of olive oil.
STEP 7: Take the dough out of the fridge and squish it with your hands a few times to flatten it out, and, and then transfer it to a 13 x 9 inch rimmed baking pan (sometimes called a half sheet pan).
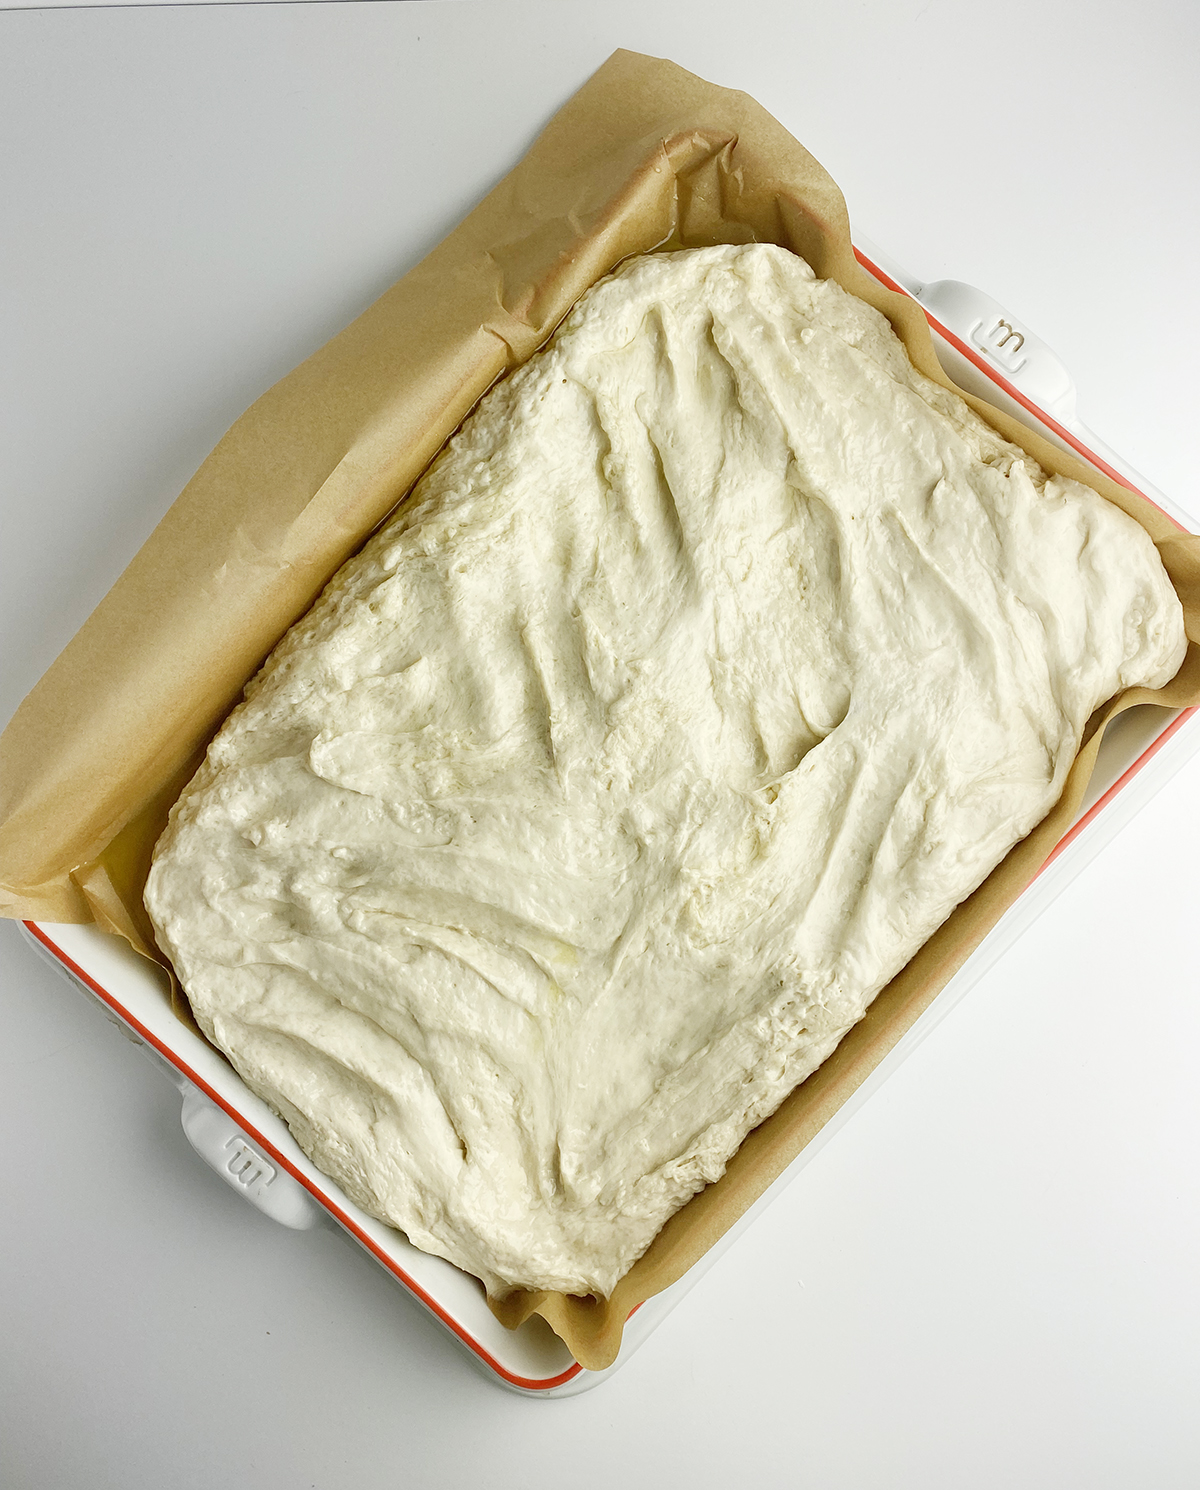
STEP 8: Smoosh it a little more until it is roughly a rectangle. Let it rise for another 2 to 3 hours (hey, nobody said this was going to be speedy!) until it is puffy and risen a bit more.
STEP 7: Preheat your oven to 450. Now smoosh the dough to the edges of the baking sheet and then press your fingers into it until it is covered in little dents. Drizzle it with another tablespoon or two of olive oil and give it a generous sprinkle of sea salt and rosemary leaves.
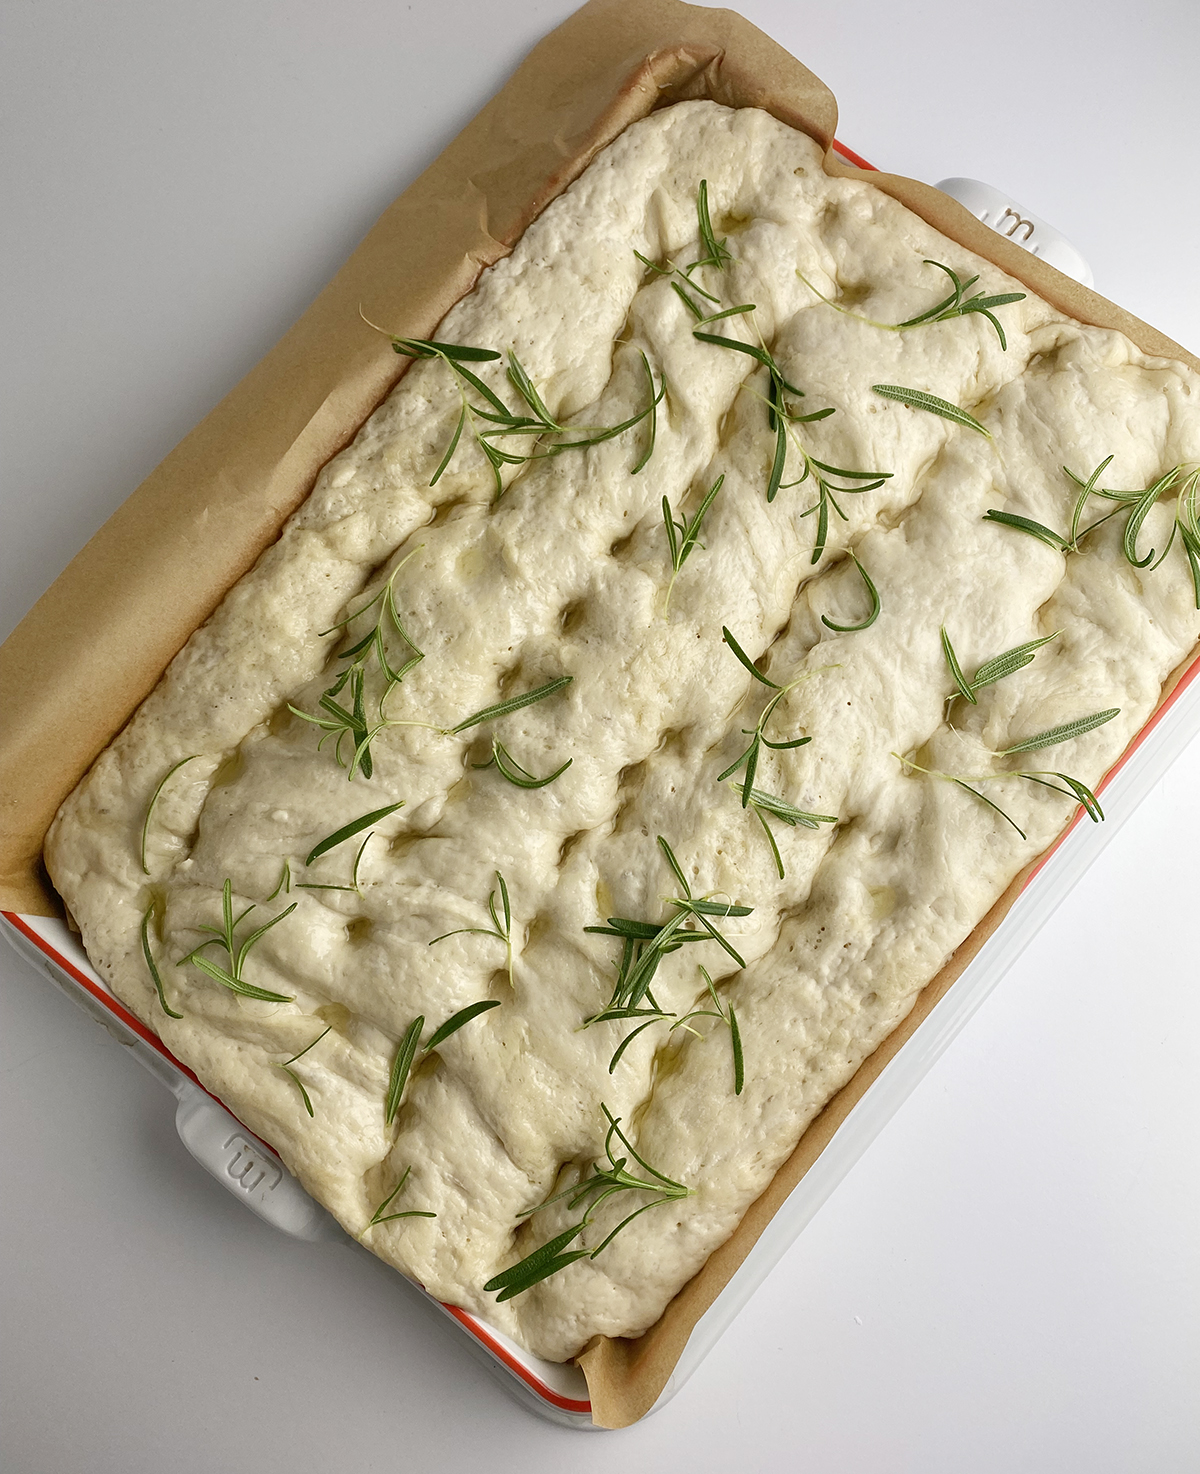
STEP 8: Pop it in the oven and bake it up until it is golden and puffed, about 25 minutes.
STEP 9: Now, this last part is optional – kinda, because it is SO delicious. Melt up a quarter cup or so of your favorite butter (hello, Kerrygold!) and drizzle it over the top. And slice it up!

Another side note: Focaccia can be cut into any size you like – I go for small squares, but strips and big squares are fine too!
Recipe FAQs
You can! Both regular yeast and instant will work just fine. Make sure you check the expiration date on the yeast package.
Yep! Sage and thyme would both be great choices, or if you live with someone who likes to pick the herbs off of things (sigh!) you can leave it off altogether.
As with most breads, this is best straight out of the oven, but will last another couple of days if it is wrapped up. Give it 10 to 15 seconds in the microwave on that last day to soften it up.
Drop it in the comments below and I will answer pronto!
Want to round out your meal?
I can 100% eat only focaccia all by itself, but it’s also fantastic alongside any dish that could use some delectable bread to mop up the sauce. My current pasta crush is this recipe for pasta with lobster sauce.
I also love making my own homemade butter (it’s so easy!) to slather on my focaccia.
Other bread recipes we love

Looking for even more bread inspiration? Here’s our complete collection of bread recipes!
Could you leave us a review?
If you try this recipe, we would love to hear how it came out for you! I’d be super grateful if you could leave a star rating (you pick how many stars! ) and your thoughts in the Comments section.
Sheet Pan Focaccia

This recipe for sheet pan focaccia is so incredibly easy you will find yourself making this buttery Italian bread on the regular!
- Prep Time: 15 minutes
- Rising Time: 10 hours
- Cook Time: 25 minutes
- Total Time: 10 hours 40 minutes
- Yield: 16 1x
- Category: Side Dish
- Method: Oven
- Cuisine: Italian
- Diet: Vegetarian
Ingredients
- 2 ¼ teaspoons active dry yeast
- 1 tablespoon sugar
- 2 1/2 cups warm water
- 5 cups flour
- 1 tablespoon sea salt, plus extra for sprinkling
- ½ cup olive oil
- 3–4 sprigs fresh rosemary
- ¼ cup butter, melted (optional)
Instructions
- Put the yeast and sugar in a large mixing bowl. Stir in 2 ½ cups of warm water, give it a gentle stir and then let it sit for 10 minutes.
- Mix the flour and the sea salt together in a large mixing bowl and add it to the yeast mixture. Mix it up until you have a nice shaggy looking ball of dough.
- Wipe out the bowl that had the flour in it and pour in a quarter cup of olive oil. Put your dough in the bowl, turn it around so it is all coated with the oil, and then cover the bowl with plastic wrap. Pop it in your fridge and let it sit overnight (you want at least 10 hours of rising time, and for the dough to be nice and big, about double in size).
- Once the dough has risen, line a 13 x 9 inch rimmed baking pan with parchment and drizzle the parchment with 2 tablespoons of olive oil.
- Take the dough out of the fridge and squish it with your hands a few times to flatten it out, and, and then transfer it to your baking pan. Smoosh it a little more until it is roughly a rectangle. Let it rise for another 2 to 3 hours (hey, nobody said this was going to be speedy!) until it is puffy and a little more risen.
- Preheat your oven to 450. Now smoosh the dough to the edges of the baking sheet and then press your fingers into it until it is covered in little dents. Drizzle it with another tablespoon or two of olive oil and give it a generous sprinkle of sea salt and rosemary leaves.
- Pop it in the oven and bake it up until it is golden and puffed, about 25 minutes.
- Now, this last part is optional – kinda, because it is SO delicious. Melt up a quarter cup or so of your favorite butter (hello, Kerrygold!) and drizzle it over the top. And slice it up!
Notes
-
- Flour: Use good old regular all purpose flour
-
- Yeast: I use the instant yeast in the jar, but the regular yeast in the packet will work just as well.
-
- Water: Make sure it is nice and warm but not HOT – yeast is an actual living thing, and we don’t want to damage it.
Is there any benefit to using a stand mixer? Or is by hand the preferred method to making your dough ball that is going in the fridge?
Hi Wanda! I think doing the dough ball by hand is the best way…it comes together easily and is gentler on the ingredients. But great question and thanks for asking!
Hello!
Trying this recipe today!
Can I leave it in the fridge for longer than 10 hours? How long is too long?
THANK YOU!
Hi Doug! You can definitely leave it in the fridge for more than 10 hours! Here’s a story about that: Last Christmas Eve I made the dough and put it in the fridge to make the next day for Christmas dinner. The next day I woke up with Covid (Merry Christmas to me!) and the dough was forgotten in the fridge for over a week. When I realized it was there, it was still nicely risen so I figured it was worth trying to bake – and it was fine! And luckily so was I! Anyway, more than 10 hours is totally okay, and I hope you love this recipe as much as we do!
Perfect! It looks beautiful this morning. It will have been about sixteen hours when I start the second rise. I’ll let you know how it turns out!
Yay! Looking forward to hearing!
I have made many no knead focaccia recipes and this one is THE best. With other recipes, even the very highly rated ones, there always tasted like something was missing from what I’ve had in restaurants. This recipe got it perfectly!! I think it’s because of the amount of sugar and oil- most recipes don’t add sugar or skimp on the oil. Sure if you want to be “healthy” you can use less but if you want absolutely delicious lip smacking focaccia you need them! I don’t even add the butter and the amount of oil is perfection. I almost cried when I thought I lost this recipe because it really is the best. Thanks Kate!!
Mary! You made my whole day – I am so glad you love this recipe as much as I do! Hurray for focaccia! :)
Thank you for sharing this recipe. I am always reluctant when trying new recipes using.yeast, but your presentation with pictures and dialogue was super useful
This is definitely a keeper.
Looking forward to trying so many of your other recipes.
Thank you
Robyn! Thank you so much for this kind note. I am a little afraid of yeast too, but this recipe never lets me down. I’m so glad the pictures helped. :) Happy New Year!
This recipe is so reliable – the bread comes out GREAT every time! The perfect side for a pasta dish. Love this!
Hi Mal! I know, I’m usually a coward when it comes to yeast, but this recipe never fails me!
What would you suggest for flour and water ratio. I have this at 98.5% hydration, which seems incredibly high.
Hi Andrew – I’m sorry but I’m not sure what you mean? At 2.5 cups of water and 5 cups of flour, there is twice as much flour as water. Not sure if that is what you needed, so let me know if I can give you more info! Happy New Year!
I think he means that 5cups of flour weighs 600g and 2.5cups of water weighs 567.5g… which is about 95% hydration.
Thanks for this Gabriel!
When you let the dough rise a second time, can you refrigerate it again for longer than three hours?
Hi Kelly! The second rise should happen at room temperature, but I don’t see any harm in letting it sit in the fridge after that until you are ready to bake it up. :)
Can I let it rise on the counter instead of the refrigerator to speed up the rising? If so, how long would you recommend?
Hi Michelle! I haven’t done it completely on the counter, but I know you can…and it will cut the time down dramatically – I think you would only need a couple of hours. The trade-off is that when bread rises in the fridge, the extra time for the yeast to work impacts the flavor and texture of the bread (in a good way)! I’m attaching a link from a baking site that I love that explains this better than I can…hope this helps! https://kneadrisebake.com/is-it-better-to-proof-bread-dough-at-room-temperature-or-in-the-refrigerator/
Huh, I never knew that. That’s for the info. I’ll do it in the fridge! I’m all about flavor and texture. :)
Me too! :)
Did you mean to say a 9×13 inch baking pan? Most recipes with 5 cups of flour use a 13×18 sheet pan. The link you include take us to a 16×12. I’m making this now, and I bought a 9×13 and it seems it’s going to be very thick and maybe rise over the edges. I just took it out of the refrigerator, so it’s sitting for the 2-3 hours.
Hi Michelle! I do make this in a 13 x 9 rimmed baking pan (also called a quarter sheet pan), and I’m sorry about that link – I’ve fixed it to be the right one. And yes, the dough is going to look big and puffy, but once you smoosh it down and put the finger dents in it, it should behave, even if you need to push it in around the edges. Let me know how it goes for you – I make this about once a week now that fresh rosemary season is here! :)
Hey Kate,
It turned out GREAT!!! I’m so happy! Thank you for answering my questions. I love to cook, but I rarely bake or make breads. But this was easy and I’m eating it now. It’s so good! And it looks just like your picture!!
You are SO nice to let me know – I was hoping it would work as well for you as it does for me! I’m not a big bread maker either (yeast sometimes intimidates me) but I do love this one. Happy weekend!
Looks good, however can you freeze some for later.
You definitely can! Just make sure you wrap it up fully, and it should defrost just fine. :)