Chocolate Dinner Mint Cake
This recipe for a show-stopper chocolate dinner mint cake is not only fabulously festive, it’s also a snap to make!

Okay, we are heading straight into the home stretch of Tis The Season, and one of things I am always doing this time of year is looking for the perfect combo of show-stopper and easy when it comes to that big holiday dinner dessert.
You know, the one that is going to get you a round of oohs and aahs when you bring it out, and then has your dining room settle down to delirious quietness because everyone is eating in happy holiday bliss…but also the one that is not going to keep you in the kitchen for hours. Welcome to that dessert!
Because I don’t know about you but for me, as much as I love to spend time puttering around my kitchen, Christmas comes but once a year and I need as much time as possible to hang out with the folks I love and do other important things like take deliberately blurry pictures of my Christmas tree with my iPhone.
It’s the little things!

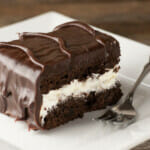
So here’s the thing about this cake. You know those delectable chocolate dinner mints – the thin square ones with the creamy minty insides?
Now imagine those mints, but in cake form. Made with BROWNIES. Yep, that’s what we are talking about here.
Here’s How You Make Chocolate Dinner Mint Cake!
The brownies are made out of your favorite mix (I like Betty Crocker, but really any kind will do, as long as it is regular old brownie mix). Make a 13×9 inch pan of it, and line the baking dish with non-stick foil so you can lift the sheet of brownie out easily.
Cut it in half and there’s your cake part. You can even do this part a day ahead.
Now for the minty filling…you are going to whip together butter, a little cream and some peppermint extract (which you can find in the supermarket right next to the vanilla extract). Whip in some confectioner’s sugar until it is nice and fluffy. That part’s now done (See? Easy!).
The last part is the glaze. You need 10 ounces of either dark or bittersweet chocolate, chopped up (I usually give it a whirl in the food processor, because the more chopped it is the faster it will melt).
Put it in a bowl, and then pour a combo of hot cream and corn syrup over it and whisk whisk whisk until everything is melted and smooth. Stir in some butter and a little more mint extract and pop it in the fridge until it firms up a little.
This recipe for a show-stopper chocolate dinner mint cake is not only fabulously festive, it's also a snap to make! To put the whole thing together, put one brownie half on a cooling rack and spread all that white minty filling over the top of it.
Place the other half on top, bottom side up (just because that will be smoother to frost). Scoop out a cup of the chocolate glaze and frost the top sides with it – you just need a thin layer.
Now comes the magic part: save a couple tablespoons of the leftover glaze and pop the rest in the microwave until it is melty, about a minute. Pour it over the top of the cake and gently spread it around, letting some run down the sides. Oh yeah.
Now for the perfect finishing touch, put those extra tablespoons of glaze into a little ziplock bag, snip the corner off and make little decorative squiggly lines on the top.
Or you can just squirt it right into your mouth and eat it. Your choice. Hey, it’s Christmas!
Now pop everything into the fridge for at least 30 minutes, and when it’s time to serve it, use a couple of spatulas to slide it on to a pretty platter.
Stand back. Let the oohs and aahs wash over you. Feel extremely happy and festive!
Dinner Mint Cake
This recipe for a show-stopper chocolate dinner mint cake is not only fabulously festive, it’s also a snap to make!
- Prep Time: 30 minutes
- Cook Time: 10 minutes
- Total Time: 40 minutes
- Yield: 16 servings 1x
- Category: Dessert
- Method: Stovetop and Microwave
- Cuisine: American
- Diet: Vegetarian
Ingredients
- One 13×9 pan of brownies, baked, cooled and cut in half (line the pan with non-stick foil to make lifting the brownies out as easy as possible!)
For the glaze
- 10 ounces dark or bittersweet chocolate, chopped fine
- 1 cup heavy cream
- 1/4 cup light cane syrup (Karo light syrup)
- 4 tablespoons butter, softened
- 1/4 teaspoon peppermint extract
For the filling
- 12 tablespoons butter at room temperature
- 2 tablespoons heavy cream
- 1 teaspoon peppermint extract
- 1 1/2 cups confectioner’s sugar
Instructions
- Make the glaze first so it has time to cool: Put the chopped chocolate in a medium sized mixing bowl. Stir the cream and the corn syrup in a small heavy pot over medium heat until it reaches a low boil.
- Pour the hot cream mixture over the chopped chocolate and whisk until smooth. Add the 4 tablespoons butter and 1/4 teaspoon mint extract and whisk again until smooth. Cover and put in the fridge until it is spreadable, about 60 minutes.
- When the glaze is set, make the filling: beat 12 tablespoons butter with 2 tablespoons cream and 1 teaspoon mint extract on medium until well-combined. Add confectioner’s sugar and beat on low until it is mixed in. Now rev the mixer up to high and beat until everything is nice and fluffy, about 3 minutes or so.
- Time to assemble! Put the one brownie half bottom side down on a cooling rack that is placed on a rimmed baking sheet. Spread all the filling evenly over it. Pop the other half on top, bottom side up (to give you a smoother spreading surface). Take 1 cup of the glaze and spread it in a thin layer over the sides and the top (if you have an offset spatula this is the time to break it out!).
- Save a couple tablespoons of the remaining glaze and set aside. Put the rest in the microwave for a minute until it is melted. Pour it over the top of the cake, using a spatula to spread it along the top and to help it drip down the sides.
- If you like, put the 2 tablespoons you saved into a ziplock bag, snip off a corner and pipe decorative squiggles over the top.
- Refrigerate for at least 30 minutes, then transfer the cake onto a platter (I use two spatulas for this) and serve!
Quick question: The recipe says 1/4 cup cane syrup (Karo). Can I use Karo light corn syrup? Thanks!
Yes! That’s the kind you should use, actually – I will add that to the recipe note. :)
Thank you! And one more question: do you know if light cream would work in the chocolate glaze?
I wish I could say yes, but you do need heavy cream to get the consistency. I promise the taste is worth it! :)
I live with a dark chocolate/mint lover. This is now on the select list of homemade holiday baked items!
That is one lucky dark chocolate/mint lover! :)
Heavenly. Just heavenly.
Aw, thank you! :)
Yum! I know this is going to be my new favorite.
Maybe we can make it together sometime soon! xoxo