• Home
  • Recipes
    • Search All Recipes
    • Recipe Round-Ups
    • Weekly Meal Plans
  • More
    • About
    • Work With Me!
    • Lifestyle
    • Outside the Kitchen
    • Kitchen Tips & Gifts
    • Contact
    • Facebook
    • Instagram
    • Pinterest
    • Twitter

Framed Cooks

My life. One recipe at a time.

Want every new recipe delivered right to your email inbox?

Sign Me Up!
Recipes » breakfast and brunch » Eggs in Clouds

Eggs in Clouds

By Kate Morgan Jackson

Jump to Recipe

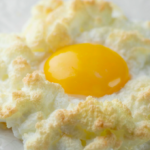
Make a simple egg a heavenly creature with this easy and dramatic recipe for eggs in clouds! It is like breakfast magic on a plate.

how to make eggs in clouds

Right after I made this super, super, super simple recipe I posted that picture up there on Instagram and Facebook, and got a whole bunch of “how did you DO that??” comments, which made me both ridiculously happy and slightly embarrassed to admit how easy it is to create Egg Drama.

So I just said “egg magic” and left it at that.

And it IS kind of magical that you can take an egg and a little shredded cheese and 15 minutes later have this.  But it’s not a fantasy, it’s real…and here’s how.

Here’s How You Make Eggs In Clouds

You need: a mixer, a cookie sheet lined with parchment or a silicone baking sheet, a little shredded Parmesan cheese, and as many eggs as you want to make egg clouds of of.  One egg per egg cloud.

Now separate the eggs, putting all the whites into a mixing bowl together, and each yolk into a separate little cup.

Here’s my chance to tell you if you invest in a set of little Pyrex prep bowls you will use them SO MANY TIMES that you will wonder how you ever lived without little Pyrex prep bowls.

Anyway.

Whip the egg whites until they form nice sturdy peaks – just like you are making meringue.  This will take a good 2-3 minutes in the mixer.  When they are whipped, gently fold in the grated parmesan.

Now divide the the whipped egg white into little round clouds on your baking sheet.  If you whipped four egg whites, you should make four clouds.  Make a little dent in the center and pop them in a hot oven for 3 minutes.

After 3 minutes, slide the baking sheet out of the oven and carefully slide the egg yolk into each little dent in the center.  Back into the oven for another 3 minutes.And that’s it!

Really.  No kidding.  That’s it.

Slide a spatula under each one and pop them on a pretty plate.  The meringue will be soft and chewy and filled with parmesan cheese flavor, and the yolk will be creamy and wonderful.

AND you will be admired throughout your house as an egg magician. Here’s a quick video to show you how simple this dreamy recipe really is…

See? MAGIC.

how to make eggs in clouds


Eggs in clouds.  Because we all need a little magic in our breakfast now and then!

Print
how to make eggs in clouds

Eggs in Clouds


  • Author: Kate Morgan Jackson
  • Prep Time: 10 minutes
  • Cook Time: 6 minutes
  • Total Time: 16 minutes
  • Yield: 2 servings 1x
  • Category: Breakfast
  • Method: Oven
  • Cuisine: American
Print Recipe
Pin Recipe

Description

Make a simple egg a heavenly creature with this easy and dramatic recipe for eggs in clouds!


Ingredients

  • 4 eggs
  • 1/4 cup shredded Parmesan cheese

Instructions

  1. Preheat oven to 450 and line a sturdy cookie sheet with parchment paper or a silicone baking mat.
  2. Separate eggs, putting the whites in a large mixing bowl and the yolks in separate little cups.
  3. Whip the whites at high speed until stiff peaks form, about 2-3 minutes.
  4. Gently stir in the cheese, then divide the whites into 4 “cloud” shapes on the baking sheet. Make a little well in the center of each cloud.
  5. Bake for 3 minutes, then slide the cookie sheet out and gently slip a yolk into each well. Cook for another 3 minutes.
  6. Gently remove with a spatula and serve!

Notes

Need to add something to your kitchen equipment to make this recipe? Below are some of the items we used in the Framed Cooks kitchen to help cook this up. These are affiliate links to things we use and love, which helps to pay for all that bacon I keep buying!

Equipment We Used For This Recipe

Image of Silpat

Silpat

Buy Now →
Image of Parchment Paper

Parchment Paper

Buy Now →
Image of Cookie Sheet

Cookie Sheet

Buy Now →
Image of Hand Mixer

Hand Mixer

Buy Now →
Image of Prep Bowls

Prep Bowls

Buy Now →
1850.5 g311.6 mg12.2 g4.9 g0 g1.1 g0 g16.3 g379.2 mg

We love seeing what you do
with our Framed Cooks recipes.

Just tag @FramedCooks on Instagram, Pinterest or Facebook
so we can admire the deliciousness!

19634 shares
  • Facebook4186
  • Twitter
  • Yummly
Kate Morgan Jackson

Hi there!  I’m Kate, and I’m a recipe writer, food photographer and devoted bacon lover.  I started Framed Cooks in 2009, and my mission is to create and share family-friendly recipes that make cooking both easy and fun…yes, I said FUN!  My kitchen is my happy place, and I want yours to be that place too.  And if you make this recipe, I would love you to tag @FramedCooks on Instagram so I can see the deliciousness!

Know someone who would love this recipe?
Click here to email them the link!

Published on August 3, 2014

Good for: Brunch, Dinner In A Hurry, Easter, Kate's Favorites, Lent, Mother's Day

Last Post:
Blue Cheese Pesto Pasta
Next Post:
Salisbury Steak!

I'D LOVE IT IF YOU WOULD RATE THIS RECIPE
(AND COMMENTS ARE WONDERFUL TOO!) Cancel reply

Your email address will not be published. Required fields are marked *

Recipe rating ★☆ ★☆ ★☆ ★☆ ★☆

Comments

Want a photo beside your name? Go to Gravatar.com, sign up for a free account, and upload a photo. It's super easy!

  1. Judy in SATX says

    August 4, 2014 at 6:27 am

    Love this! If I prefer a firmer yolk, can I out the yolk on the nest right at the beginning? Thanks!

    Reply
    • Kate says

      August 4, 2014 at 7:37 am

      Hi Judy! You know, I haven’t tried it that way but I don’t see why that wouldn’t work just fine. If you test it out will you come back and let me know how it goes? :)

      Reply
    • Dawn H says

      August 6, 2014 at 10:48 am

      You can absolutely add them at the beginning! I tried them today. I checked them at six minutes (but only had the oven at 350, since I was doing biscuits at the same time) and they were not done, so I left them in. 15 minutes (along with the biscuits) at 350 was perfect!

      Reply
      • Kate says

        August 6, 2014 at 11:12 am

        Thanks so much Dawn – great to have this variation on the cooking temp and time! (And I bet they were great with biscuits!)

        Reply
  2. Brin de cuisine says

    August 4, 2014 at 7:45 am

    this is a very nice and yummy idea, thank you !

    Reply
    • Kate says

      August 4, 2014 at 7:56 am

      My pleasure – hope you love it as much as we do!

      Reply
      • Daniel says

        May 12, 2017 at 5:31 am

        Would be nice to know what temperature you use for 3mins and if one could microwave them

        Reply
        • Kate says

          May 12, 2017 at 8:05 am

          Hi Daniel! Sorry, but these can’t be microwaved – you need the oven, and you do need those 6 minutes at 450. But it will be worth it! :)

          Reply
          • Sue says

            May 12, 2017 at 12:08 pm

            Hi Kate – the recipe says 450 but your comment here says 425. Which is the temp you use?

          • Sue says

            May 12, 2017 at 12:09 pm

            Hi Kate – the recipe says 450 but your comment here says 425. Which is the temp you use?

          • Kate says

            May 15, 2017 at 11:25 am

            Sorry about that – 450 is the right temperature. :)

  3. Elizabeth Alvarez says

    August 4, 2014 at 1:22 pm

    Dear Kate,
    This recipe and savory surprise made my 10 and 1/2-year-old VERY happy — we served on hot buttered toast – perfect for a lazy dog day of summer morn.
    Thank you!!

    Reply
    • Kate says

      August 4, 2014 at 1:47 pm

      Hot buttered toast (a thing of beauty in itself) would be PERFECTION with these. I’m going to try that next!

      Reply
  4. Letty says

    August 4, 2014 at 1:44 pm

    Wow! I had never hear of these. Totally makes sense and I cannot wait to try them out.
    A rockin’ recipe!

    Reply
    • Kate says

      August 4, 2014 at 1:46 pm

      Thanks Letty! The egg is an Amazing Thing. :)

      Reply
  5. Susan says

    August 5, 2014 at 12:18 am

    So very cute. Thanks Kate.

    Reply
    • Kate says

      August 5, 2014 at 2:53 pm

      Aren’t they adorable? Thank YOU! :)

      Reply
  6. Becca says

    August 5, 2014 at 10:31 am

    We can’t do dairy. Could I eliminate the cheese or would I need to substitute something in its place?
    Thanks! This recipe looks delish.

    Reply
    • Kate says

      August 5, 2014 at 2:52 pm

      Hi Becca! I think if you added a little seasoning to the whites – just salt and pepper to give them a little zing – they would be fine. The major flavor comes from the lovely yolk!

      Reply
    • Liz Nealon says

      May 10, 2017 at 8:32 am

      I would sprinkle some nutritional yeast to replace the parmesan. Should punch up the taste without adding dairy.

      Reply
      • Kate says

        May 12, 2017 at 8:04 am

        Great idea Liz!

        Reply
  7. Worlds Worst Cook says

    August 5, 2014 at 1:35 pm

    I am a disaster in the kitchen – But saw this and thought, why not!

    Made it for my two daughters aged 4 and 3, whipped up the egg whites, forgot to add the parmesan so sprinkled it on the top before I put the ‘clouds’ in the oven and served on brown buttered toast – They loved it!!

    Every morsel consumed with passion!

    No more tinned beans on toast for my two!!

    Thanks so much for sharing!

    Reply
    • Kate says

      August 5, 2014 at 2:51 pm

      Well, you are no longer the world’s worst cook then! I’m so glad they (and you) liked it!

      Reply
  8. Vickie says

    August 5, 2014 at 9:28 pm

    Such a neat idea and simple. Can’t wait to try them in the morning!

    Reply
    • Kate says

      August 6, 2014 at 11:15 am

      Hope you love them as much as we do!

      Reply
  9. Joanne says

    August 5, 2014 at 11:25 pm

    I’m so amazed! How did you ever think of these?!

    Reply
    • Kate says

      August 6, 2014 at 11:14 am

      I had a vague memory of these from my childhood (can’t remember if it was at home or at a restaurant), and so did a friend of mine who reminded me of them recently…so I decided to recreate them. Just as good as I remembered!

      Reply
  10. Vickie says

    August 7, 2014 at 8:45 am

    We have been eating these for many years, but we fix them a little different. We put a slice of bread down, then a slice of cheddar cheese, then the whipped egg whites, then the yoke, then sprinkle the parmesan cheese on top and cook in oven till done. OMG they are so yummy!

    Reply
  11. Foodiewife says

    August 9, 2014 at 10:44 pm

    These are brilliant! I’m in the breakfast making doldrums, so this will be a fun new twist in the morning. Thanks!

    Reply
  12. Ro says

    August 13, 2014 at 9:25 am

    My son loves fried eggs, over easy, runny side up, tolerates scrambled, so “boring”…

    He is going to LOVE these eggs.

    Reply
    • Kate says

      August 15, 2014 at 8:36 am

      Hurray! Gotta get those kids to eat their eggs!

      Reply
  13. Sal says

    August 16, 2014 at 3:01 pm

    Nice job. Have you consider frying them? How about adding sautéed sliced mushroom, or chopped pepper and onions, Lots of possibilities. I like it very much.
    Thanks.

    Reply
    • Kate says

      August 16, 2014 at 8:31 pm

      I don’t think the clouds would fry well – I think it needs the circulating heat of the oven. But definitely try the mix-ins!

      Reply
  14. Myrna says

    September 2, 2014 at 11:38 pm

    I have been making baked eggs for years. I use dry toast then put the whites on leaving a hole in the middle for the yolk.

    Reply
    • Kate says

      September 3, 2014 at 8:02 am

      Aren’t they the best? And toast makes them even better. :)

      Reply
  15. Maddie says

    January 1, 2015 at 8:35 pm

    HI!Kate I’m just 10 but I love to cook. I thought the cloud eggs were such a good idea. They were adorabe. I love your resipes like your chocolate dinner mint cake

    Reply
    • Kate says

      January 2, 2015 at 4:51 pm

      Hi Maddie! How great that you are cooking at age 10 – that’s when I started to cook, too! And thanks for leaving me a comment about the eggs in clouds – I think they are pretty cute, too. Happy New Year! :)

      Reply
  16. Andrea says

    November 7, 2015 at 6:06 pm

    Wow! I can’t wait to make these!!! :D

    Reply
    • Kate says

      November 8, 2015 at 2:54 pm

      They are truly like egg magic! :)

      Reply
  17. Matt says

    August 13, 2016 at 6:04 am

    Not impressed at all. I followed this recipe and the egg whites collapsed as soon as I folded the cheese in. If I was to truly describe how I’m feeling after making this I would say that I’m frustrated and pissed off. ????????????????????????????????????????

    Reply
    • Kate says

      August 13, 2016 at 6:15 am

      Hey Matt! I don’t blame you for feeling frustrated – that’s exactly how I feel when recipes don’t come out right. I’m thinking that if you try it again (and I hope you do – these eggs are so good, I promise) you could try beating the egg whites a little more so that they are a little firmer, and then make sure the cheese is really grated finely. I like to use a microplane grater for my cheese so that it comes out super light and fluffy. One way or the other, I appreciate your feedback – truly!

      Reply
    • Tess says

      January 27, 2017 at 3:04 pm

      Hi Matt. Try adding the tiniest bit of cream of tartar to your egg whites as you beat them. 1/8th of a teaspoon for every egg white. Beat your eggs to stiff white peaks before you incorporate the mix ins. Cream of tartar is an absolute must for most recipes that call for stiff beaten egg whites ( like angel food cakes or meringues) but surprisingly few recipes seem to list it in their ingredients.

      Reply
      • Kate says

        January 28, 2017 at 8:41 am

        Thanks Tess – great suggestion!

        Reply
  18. Beyahdonna says

    September 10, 2016 at 1:13 pm

    Is there risk of Salmonella from the raw-ish yolk? Used to love Sunny Side Up, but then got scared at age 11, since I found out about Salmonella… I loved dipping toast in it or just making a sandwich out of it! Now I only scramble since I don’t like well done solid yolks, and I cook them BROWN lol Luckily my son loves them that way, but back to my point, sorry… adhd… Does the 6 min for whites and 3 min for yolk eliminate the risk? Beautiful piece of artwork btw! Kudos!

    Reply
    • Kate says

      September 10, 2016 at 3:16 pm

      Hi there! I wish I could say yes, but I think the advice is generally to cook eggs until they are firm to totally eliminate all risk. I think you could leave these in the oven until the yolks were firm, but that won’t work for you since you don’t like them well-done. Luckily there are all kinds of great scrambled egg recipes too – here is my fave! https://www.framedcooks.com/2012/10/soft-scrambled-eggs-with-ricotta-and-chives.html

      Reply
  19. Karen says

    May 8, 2017 at 9:36 pm

    I prefer my meringue with chocolate chips! :)

    Reply
    • Kate says

      May 9, 2017 at 5:53 am

      Ha! Well, I can’t argue with that – yay for chocolate! :)

      Reply
  20. E.George Da Marjian says

    May 9, 2017 at 4:31 am

    Hi Kate,
    just wanted to share a old technique for frying eggs that you may like to pass on to others. Use about a half to a whole teaspoon of Hot or Mild Giardiniera oil to an equal amount of butter and fry 2 to 3 eggs to your liking. Talk about hot and Zesty! you won’t need any salt or pepper to say the least. I have to admit that I dive in dipping with fresh French bread.

    Reply
    • Kate says

      May 9, 2017 at 5:52 am

      Wow! Love this spicy idea…definitely going to try this! :)

      Reply
  21. Martha in KS says

    May 15, 2017 at 5:05 pm

    I was excited when I saw this recipe on TODAY Show’s website. I bought parm so I can make them. Thanks for a gorgeous recipe.

    Reply
    • Kate says

      May 20, 2017 at 7:40 am

      Thanks Martha! It’s so much fun!

      Reply
  22. Adina says

    May 17, 2017 at 3:53 am

    What a fun idea!

    Reply
    • Kate says

      May 20, 2017 at 7:39 am

      It’s egg magic!

      Reply
  23. Grandmalou says

    August 7, 2014 at 6:04 pm

    I made those like you said and added crumbled to the egg whites after they were whipped. Turned out great

    Reply
  24. Grandmalou says

    August 7, 2014 at 6:06 pm

    oops that was supposed to read crumbled bacon

    Reply
  25. Kate says

    August 8, 2014 at 4:56 pm

    Crumbled bacon??? LOVE IT – you are a cook after my own heart. :)

    Reply

Hi, I’m Kate! I’m a recipe writer, food photographer and devoted bacon lover. I’m so glad you’re here!

If you want to know more….

These recipes are trending up! Come see what the excitement is about!

  • Pastina with Egg and Cheese, Otherwise Known As Comfort Food
  • Pasta with Buttered Egg Sauce
  • Lemon Garlic Lobster Pasta
  • Julia Child's Filet Of Sole
  • Grandpa's Coca-Cola Ribs

Want every new recipe delivered right to your email inbox?

  • Home
  • Starters
  • Breakfast
  • Lunch
  • Dinner
  • Dessert
  • Contact
Terms of Use • Privacy Policy

Copyright © 2023 Framed Cooks
All photographs © FramedCooks and may not be used for any purpose without written permission. As an Amazon Associate I earn from qualifying purchases.

19.6K shares
19634 shares
  • 4186